Having a Pre-Built Gaming PC is Okay, but Building your Gaming PC Setup is fun and exciting. In this article, I will teach you How to build a Gaming PC. Most people think that building a PC is hard, but it isn’t, and it is a step-by-step guide on how you’re going to do it.
This guide is about how you will assemble your Gaming PC, so first, you must buy all the PC components according to your needs. Here, we are building a High-End Gaming PC, but the process for building other PCs will remain the same, while the only difference you will have is your Components.
We are solely focusing on assembling the Gaming PC, so this won’t be How to Buy the best PC Parts for your PC or Which type of PC Build you need according to your budget. But you can check these: PC Build under your Budget, How to buy critical components like CPUs, GPUs, RAM, Motherboards, Cases, PSU, and Accessories like Gaming Headphones, Gaming Keyboards, Gaming Chairs, etc.
While Building your Gaming PC, you will face some difficulties like the CPU AIO cooler blocking the access ports, then plugging in the power or fan cables before it blocks the access to ports, or the CPU cooler blocking your RAM slots, in that case, insert your RAM first. This problem occurs when you use custom CPU coolers. So, no need to worry.
There are other problems like your GPU not sitting correctly in the PC case or the case being small, so you have to install these components in a different order so it won’t block slots, ports, or connectors.
Be very mindful of your components, which will sit where. Sometimes, even the regular PC Builders are obstructed by these problems. Read the Manuals. If needed, you have to pull out some components and Re-insert them to adjust everything.
How to Build a Gaming PC?
What you require for Building a PC is a clean workspace and the necessary tools and parts:
- PC Components
- Screwdriver (#1 and #2 size)
- Zip ties or twist ties for cable management
- Flashlight (if You drop screws)
- Thermal Paste
- Motherboard Manual
- Something to hold Screws like a magnetic tray or cup
- Installation Media for your OS
- Anti-static wristband or mat (optional)
What are the core components of building a PC?
The Core Components of your PC will be:
- CPU
- GPU
- Motherboard
- RAM
- PSU
- SSD/HDD
- CPU Cooler
- Case
Basic Terms to Know
CPU – Central Processing Unit, also known as Processor. It is the brain of your computer that handles all computing operations. For now, you have only two brands, Intel and AMD.
GPU – Graphical Processing Unit, also known as Graphics Card. It handles all your graphical-intensive tasks. You have three brands now that are Intel, AMD, and Nvidia.
Motherboard – This is a PCB (Printed Circuit Board) where we connect all the computer components. It allows all the connected components to talk with each other and work properly.
RAM – Random Access Memory, also known as System Memory. All the data or programs prepared for execution by the CPU are stored in the RAM.
PSU – Power Supply Unit is used to deliver power to your PC and its components.
SSD – stands for Solid State Drive. These are typically faster than hard drives used for a system boot drive. These are NAND memory Flash-based storage devices.
HDD – stands for Hard Disk Drive. These are slower storage devices that contain movable parts.
PCIe – stands for Peripheral Component Interconnect Express. Generally, it is used for Expansion cards like Graphics cards, SSDs, Wi-Fi cards, Sound cards, etc.
NVMe – stands for Non-Volatile Memory Express. It is a communication interface supported by your M.2 SSDs that allows you to access and save your data faster.
SATA – stands for Serial AT Attachment. It is also a communication interface used by SATA SSDs and Hard drives.
M.2 slot – It is present in most of your motherboards used to connect M.2 SSDs. It supports mSata SSDs and PCIe/NVme M.2 SSDs.
OS – stands for Operating System. It manages all the software, hardware, and resources in your computer.
Precautions to take while Building a PC
Taking precautions while building a PC is essential due to static electricity that may fry your components. You can use anti-static wrist wrap or anti-static mats while building a PC.
Always avoid wearing socks and standing on a carpet, touching plastics or metals, or rubbing against any cloth materials that generate static electricity. Standing on a bare floor while building a PC will be a better choice.
How to install a Processor into a Motherboard

I am going for an AMD build, but the Intel build will have a similar process. Early on, AMD AM4 or lower chipsets had CPU connecting pins on the chipset itself, while Intel didn’t, but with AM5, everything changed. Now, AM5 chipsets do not have connecting pins on the CPU.
The Latest (12th/13th gen) Intel and AMD AM5 have connecting pins on their motherboard socket. AM4 or earlier chipsets were more prone to bending the CPU connecting Pins which damages not only your CPU but also your wallet. So be careful while installing a Ryzen 5000 or older processor in their respective motherboard CPU socket.
Step 1: First, remove your motherboard from the antistatic cover and place it on a flat, hard, and non-metal surface, such as a wooden table or the top of the Motherboard box. Keep your Motherboard manual on the side as well.
Step 2: Remove the plastic cover from the motherboard CPU socket by unhooking the metal retention lever.
Step 3: Now, Insert the CPU by lining the triangle/arrow on the top corner of the CPU with the arrow/triangle of the CPU socket on the motherboard. Put the CPU gently on the socket and let it sit by its weight. If not seated properly, then re-seat it again. Don’t press the CPU, or you will damage the CPU or the CPU Socket.
Verify, if the CPU is seated correctly or not with a little side-to-side nudge. If yes, then lower the retention lever and lock down your processor, though it requires a little bit of pressure.
The same for Intel CPU as well though the 12th and 13th gen require some amount of pressure to set the CPU into the socket to the point that it might start bending CPU socket pins.
If you have verified that the CPU is seated correctly, then it won’t be an issue. It requires the CPU retention lever to push down quite hard to get it into the retention tab.
How to install the CPU Cooler

Most of the CPUs come out with stock coolers in the box but some builders like gamers or testers overclock their CPUs which results in high temps so they buy aftermarket coolers or AIO coolers to reduce those temps which also have fancy visuals and cooler looks.
Stock coolers, AIO coolers, and some aftermarket coolers have pre-applied thermal paste on them, so you just have to remove the plastic protection layer off the cold plate/paste area before installing the cooler. If you forget that part then you have to reopen almost half the PC parts when you see abnormal temps.
Step 1: After removing the protective film from the cold plate/paste area of the cooler, be sure to apply some pea size (about 3 mm) thermal paste on the center of the AMD CPU (but for the Intel CPU a pattern of 5 smaller dollops) as well to lower your temps as min as possible. The thermal paste will look like a short syringe tube with silver paste inside it.
Step 2: Most of the Aftermarket coolers (either Intel or AMD) and some stock AMD coolers have metal clips that fit into the notches present on the plastic brackets on either side of the CPU socket.
Gently press down the CPU cooler on top of the processor align the metal clips on one side with the plastic bracket notches and press down the metal clip on the other side.
But in some cases for both Intel and AMD stock coolers, you have to remove the plastic brackets from the socket and then gently put the coolers on top of the processor and install the screws on a cross pattern by a couple of turns at a time and then tighten the screws which will balance the pressure applied on CPU by the cooler.
Remember you have to apply gentle pressure on the cooler from above due to springs present on the screw section of the cooler.
Some aftermarket coolers require the removal of these plastic brackets on the AMD motherboard and aligning the screws of the coolers with the motherboard holes. Please check the manuals if you are going to use aftermarket coolers.
Don’t forget to place the backplate on the back of your motherboard while installing your cooler. If you are using large aftermarket Air coolers it may block your RAM slots, so in that case you have to install your RAM first and then place your cooler.
If you are installing an AIO cooler you have to remove both the plastic brackets and the backplate on the back of the motherboard and install the custom backplate (Applicable to both the Intel/AMD CPUs).
You also have to put them after you have installed everything on the motherboard and put the motherboard inside the case because you have to install the radiator either front or on top of the case.
Before mounting the pump, plug in the power cables on the pump so you won’t have a problem connecting them after seating the pump on the motherboard. Refer to the manuals as well to install them correctly.
Step 3: Now plug in the fan power cable connector with the motherboard fan header. If you have a dual-fan cooler you have to connect to the 2nd fan connector. For the AIO cooler, there is a “CPU_PUMP” header on the motherboard, plug the pump connector on it, and then plug in the radiator fan on the “CPU_FAN1” and “CPU_FAN2” headers. Check the motherboard manuals for the CPU fan connection header and the AIO cooler manual.
How to install RAM

Installing RAM into the motherboard isn’t too hard if the motherboard has two RAM slots. The issue comes when you have four slots.
Now, why the issue? Because you have to choose the right slot among those four slots to install your new RAM otherwise your PC either won’t recognize the RAM or your Gaming PC won’t turn on.
So, inserting your RAM or DIMM in the right slot is important. Refer to the Motherboard Manual for the right slot.
Step 1: After knowing which slot to put your RAM in, push down the RAM buckle on either end of the slot to open the slot. Some motherboards have RAM buckles/locks on both ends while some have only one end.
Step 2: Now position your RAM stick over the slot align it with the notch of the slot and gently press the RAM stick down in the slot. If you have seated your RAM stick right you will hear a click sound and the RAM buckle will automatically lock itself up.
If not then you have to flip your stick around but before that, if you have inserted your RAM stick in the slot and you didn’t hear the click sound but the buckle automatically locks itself up you have to open the buckle again and reinsert your RAM stick correctly.
Installing the M.2 SSD

Now it’s time to install the M.2 SSD but first, you have to figure out which type of M.2 slot your board has. There are 2 types as we know of M.2 SATA or M.2 PCIe/NVMe slots and not all the M.2 drives fit into every M.2 slots. So, check your SSD drive and the compatibility of the slots because people often get confused between these.
You must also check the PCIe Gen 3.0, 4.0, and 5.0 of the SSD drive and the slot. for example, if your motherboard supports Gen 4.0 M.2 NVMe drive and you inserted Gen 3.0 M.2 NVMe you will get speed comparable to Gen 3.0. So, put the Gen 4.0 drive on the Gen 4.0 slot.
Some boards have more than 1 slot so choose which slot you will install your M.2 SSD drive, and once you have selected the slot remove the heatsink/cover using a screwdriver to get to the M.2 slot (some boards don’t have a heatsink/cover).
After removing the heatsink/cover insert the M.2 SSD drive into the M.2 slot by lining it up with the notch of the drive. if your notch doesn’t line up with the slot then it may not be compatible with the slot (Check the board manual for more details). If your boot drive is PCIe, install the M.2 drive into the M.2 slot nearest to the CPU.
Once you installed the drive into the slot, gently lay flat the SSD and put the mounting screws to lock the SSD drive, before putting the heatsink/cover remove the plastic protective film from the inside of the heatsink/cover just like you did on the CPU cooler paste plate for better thermals.
Putting the Motherboard into the Case
Now that we have equipped the motherboard with RAM, CPU, and M.2 SSD. It’s time to put them into the case but first remove the side panels of the case. Use your case guide manual if you find it hard but it isn’t hard you just have to knock out some screws.
I/O Shield

Image credit: Gigabyte
Now it’s time to put an I/O shield in your motherboard, Some motherboards come with preinstalled I/0 shields in that case you can skip this step and start mounting standoffs in the case.
If not then you have to install the I/O shield where the motherboard’s rear ports are, It comes with the board itself just put it on the rear port of the board, and it requires some force to fit in there.
Be sure to put it the right way or you will block some of the ports. Be careful while applying force to put the I/O shield because you may get hurt in the process due to the sharp edges of the shield.
Standoffs
Standoffs are just like screws but have holes in them to accommodate another screw in it or you can say female screws. They come with your PC Case/Cabinet. Some cases have preinstalled standoffs while some do not.
If you don’t have preinstalled standoffs then you have to put those standoffs into the case using needle nose pliers or if you have preinstalled standoffs but some are in the wrong spot for your motherboard then you have to get them out and put them in the correct holes to mount your motherboard into the case.
Installing the Motherboard

After putting all the standoffs into the case, It’s time to install your motherboard. First, check if the standoffs are aligning with the motherboard holes. If yes, then check if the motherboard is correctly placed into the case that is motherboard’s rear ports should be aligned with the case I/O shield cut-out.
If everything is fine, then put screws through the holes in the motherboard into standoffs and tighten them, that’s it now stand your case for the further build process.
How to Install a Power Supply

Till now we have installed most of the PC components, It’s time to plug in Power Supply for your Gaming PC. All the latest PC cases have a place at the rear bottom to accommodate your PSU/Power Supply where it can pull cool fresh air under the chassis.
In older PC cases, your PSU was mounted at the rear top of the case. Refer to Case manuals if you’re having trouble finding the proper location.
Step 1: Take out your PSU from the box and check if it’s modular or non-modular. If it’s modular then you have to plug in all the power cables that you need into the PSU before installing it into your case. If it’s non-modular then all the power cables are already attached to it.
Step 2: Now install your PSU at the rear bottom of your case or your PSU slot with the PSU fan facing downward so it can intake cool air from below your case.
In some cases, you will have to remove the bracket to install your PSU in the case. Generally, you have to push the PSU from the inside and mount the four screws to the case.
Step 3: After attaching your PSU to the case, you have to route the 24-pin power connector and CPU/ supplemental power connector through your case and plug them into the motherboard. Refer to your motherboard and PSU manuals for connecting the cables to the right connector.
You may face problems while connecting your CPU connector as it is located at the top of the case as it is harder to plug in. Recheck all the connectors are connected properly and to the right power pins in your board.
Adding HDD/SATA SSD

For Extra storage, I will add HDD and SATA SSD to the gaming PC as we have already installed the NVMe SSD. Generally, HDD comes in 3.5″ inches and 2.5″ inches in size, both sizes are compatible with the PC, and SATA SSD comes in 2.5″ inches in size.
Look for HDD and SATA SSD mounting points in the Case. In most cases, the mounting cage/bracket will be at the back side of the Case right beside your PSU slot. If unable to find it, then you must refer to your Case Manual.
Connect your SATA data cables to the motherboard and the drives you are going to use and then connect the SATA power connector from the PSU to the drives. The process is similar for both HDD and SATA SSD.
After connecting all the required cables, mount the drives in your PC Case using screws to their appropriate mounting point. In some cases, you first have to mount your drive into the case and then you have to plug all the cables, it depends on which way will be convenient for you.
How to install a Graphics Card

If you’re not building your PC for gaming, video editing, or other GPU-intensive tasks but for casual work you don’t need a graphics card. There are processors for both Intel and AMD that have integrated graphics, you can use those processors.
For AMD look for processors with the codename “G” in it and for intel, you can look for any processor except for the codename “F” in it.
I would prefer to go for AMD APUs if you want casual gaming and on a low budget. AMD processors which come with integrated graphics are called APUs.
Now comes the best part as I am building a high-end gaming PC means I have to use a beefy graphics card. So if you are going to install a beefy GPU like me and you have a large case then follow me and if you have a small or cramped case these large GPUs may block your motherboard header and connectors if you install it now. So you might wanna do it later.
Step 1: Take out your graphics card from the box remove the anti-static plastic cover and remove the protective cover on the GPU connector plate.
Look for a PCIe x16 slot in the motherboard some boards have two x16 slots. Always use the topmost one which is closest to your CPU, if your board has two PCIe x16 slots.
To install the GPU on the slot you have to remove some backplates from the case so that your GPU display ports, HDMI, and other ports will be visible from the back of the case which will let you connect your monitor later.
Remove the 2nd and 3rd plates or even 4th if necessary but not the 1st one depending on the case. You can remove the plate by either removing the screws or just pushing the plates out of the case, or folding the plate left and right and it will come out automatically.
Step 2: After removing the plates, open the buckle of the PCIe slot by pushing down and then install the GPU on the slot by aligning it with the notch of the slot, You need to push your GPU a little bit to seat it in the slot.
If seated properly you will hear a click sound and the PCIe slot buckle will lock itself but in some motherboards, you won’t hear the click sound.
Check if the GPU ports are visible from the back of the case, and if the ports are not visible you have to either remove the plates or correctly reinstall your GPU. and then tighten the back of the GPU with screws to the case so that your GPU won’t fall or damage the PCIe slot of the motherboard due to its weight.
Step 3: Now connect the PSU power cables to the GPU, the power connector will be either on top or sideways of the GPU face away from the motherboard. Remember the GPU comes with one, two, or even three PCIe power connectors.
It may be a 6-pin, 8-pin, 6 + 8-pin, 2 x8-pin, or even a 3 x8-pin PCIe power connector or the new 12-pin VHPWR for the RTX 4090 and 4080 cards. If you are facing any problems refer to the GPU or PSU manual for the appropriate power connector.
Lower-end graphics cards won’t need any external power source as they consume power from the PCIe slot itself. Cards that require less than 75 watts in power.
If you are installing RTX 4080 or 4090 cards you may want to invest in ATX 3.0 power supply which comes with 12 VHPWR connectors. All the GPUs come with a power adapter if some of the PSU power connectors don’t fit in your GPU.
Installing a Wifi Card (Optional)
Many motherboards come with built-in Wi-Fi while some mid-tier motherboards do not. In that case, you can utilize your PCIe x1 or PCIe x4 slots to install an Expansion card which may be a Wi-Fi card, sound card, or video capture card.
If you are going to install a Wi-Fi wifi card you might want to remove one of the back plates of the case. If you are using your PC for gaming, streaming and any internet-related tasks use ethernet cables which will be way better than Wi-Fi connectivity. You can use a Wi-Fi USB dongle for Wi-Fi access as well.
Cable Connections

The last cable connection will be to connect your case connectors to your motherboard before turning on your PC. Make sure to connect any fans to the motherboard fan headers.
Now connect the front panel audio cable, and USB 2.0, 3.0, 3.1, or 3.2 case connectors to the motherboard. You might want to use your motherboard manual for this process.
Now connect all the tiny front panel connectors for the HDD LED, Power switch, and reset connectors to their appropriate pins into the motherboard.
I highly suggest you use your motherboard manual for this process as you may connect the wrong connector to the wrong pins due to its tiny size. Double-check these headers.
If you have a compact or small size case now is the time to install your graphics card or any other supplementary Power cables.
Turn On Your Computer
Before turning on your PC check all the power cables or fan headers if they are seated correctly. After that plug your monitor connector cable into one of your graphics card ports may be HDMI, or Display port. If you have an old monitor you have to buy an HDMI cable or Even VGA to HDMI connector.
If you are not using a graphics card then you have to connect your monitor to the motherboard HDMI or VGA port. Plug your keyboard and mouse into your PC and then put the power plug into the PSU switch on your PSU button and plug your monitor power cable into the switchboard and turn it on.
Now Push the PC’s power button and check if your PC turns on, If it is then it will run in POST (Power-On-Self-test) mode because we haven’t installed any OS yet, you may get an error message about missing boot drive or you will get directly to the UEFI/BIOS.
If for a specific reason, your PC didn’t turn on then you have to recheck every part if they are seated, and plugged in correctly to the correct pin or slot.
Install an OS, Drivers, and Updates

Get your installation media ready. You will need to have a bootable USB drive of at least 8 GB or more and access to another PC or Laptop.
Create your USB drive bootable using the Windows media creation tool or Rufus and Download Windows 10/Windows 11 or any other Operating system of your choice on the USB drive. If you are fully focusing on gaming and streaming Windows 10/11 will be more suitable for you.
Step 1: For Windows, I am using the Windows media creation tool, Visit the Microsoft Windows download page for Win 10 or Win 11 and navigate to “Create Windows 10 or 11 installation media” Download the tool from the download button.
For other OS, You have to download the ISO file of the OS and use Rufus to create a bootable USB drive.


Step 2: Insert your USB drive and run the tool. Accept the terms and then select “Create Installation Media”, After that check the “use recommend option”, click on USB flash drive, and select your USB drive for installation.
It will take some time to download Windows depending on your internet speed. After downloading and creating of installation media, click on finish.

Step 3: Insert the bootable USB drive into your Gaming PC and Go into your BIOS/UEFI using the “F2/del” or “F10” key. Different motherboard brands have different ways to enter into boot mode so please Refer to the motherboard brand official page, then choose your bootable USB drive and place the bootable USB drive in boot order that is before any other storage devices.
Step 4: Save the boot sequence or priority order. Go to Fast Boot/Quick Boot to boot in Windows using your bootable USB drive and your PC will boot in Windows or the OS you used to create a bootable drive. After that you will be greeted with the setup option, Select the language, time, and keyboard type according to your country.
Hit the next button, and start installing Windows if you don’t have the key just choose “I don’t have the key” and proceed, choose your Windows edition and proceed, then choose “Custom Install” and select the storage device you want to install Windows.
I will advise you to select an NVMe or SATA SSD drive which will make your Gaming PC boot faster.
After the installation, set up your OS, connect to the internet, and start downloading/updating your drivers. since I am building a gaming PC, I have to download the graphics driver as well.
You will need to go to update/security settings to update everything. It will download your display/sound or any other driver for the devices you have installed.
You also have to download a GPU game-ready driver to run games and update your motherboard drivers from their respective official pages.
Cable Management

The cables have been in a messy state till now but now we will start managing our cables to make our gaming PCs’ interiors super clean and tidy. So it’s time to shut down your PC and unplug your power cables.
Make sure the cables aren’t blocking the CPU and GPU airflow. We are doing this after we are sure that our PC boots properly otherwise we would have to tear down the proper wiring and cut down zip ties for re-seating the components and it will be a headache for us.
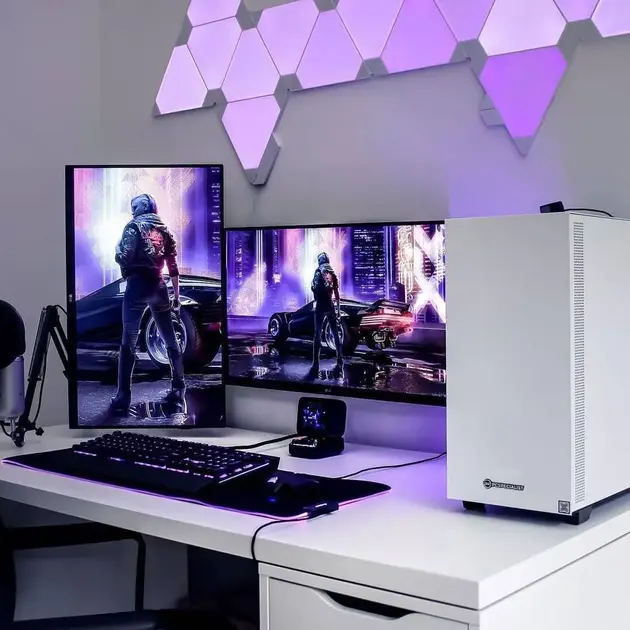
A high-end gaming PC should look cool and classy right? If you ask any gamer about their gaming PC they first tell you the power of their PC and second will be the appearance of the PC how shiny, glowy, and clean their PC is.
So clean wiring of your PC should be to route all the extra cables to the back of the case and shove all the slacking cables at the back panel of the case as well and zip tie them in a clear manner not in a jaggy way.
Gaming PC Full Setup Guide Video Tutorial
Conclusion
Our Gaming PC build is complete now, This is a gaming PC full setup guide but can be used to build basic/normal PCs as well. Now download some games, and your productive software, and enjoy gaming and streaming. Hope you Enjoy building PCs !!.
FAQs
What is a Gaming PC?
Almost any PC that can play games at 1080p 60fps or more. What makes this PC Gaming is a Dedicated Graphics card that can play pretty much any game at 1080p or higher resolution with High fps.
How much does it cost to build a Gaming PC?
For a basic 1080p entry-level gaming PC, it would cost you around 40k INR or $500, that is without including the Monitor and peripherals. If you include these your price will jump to 50k INR or $600.
What’s the difference between a Gaming PC and a Normal PC?
A PC that is capable of playing games at a minimum of 60fps at 1080p mid-high settings can be considered a Gaming PC with capable hardware to run almost any games while a Normal or Standard PC can’t even manage to do that, they lack a dedicated GPU, faster ram and a monitor to show those High FPS.
What do I need to build a Gaming PC?
You need a good 6-core or 8-core CPU while the quad-core is the line for e-sports and other old games with a good GPU to handle games.
As per Steam, GTX 1060 6GB is the most usable card by gamers because it is cheap and handle any game in 1080P resolutions but not the latest AAA titles.
A good 80+ certified PSU to handle the power of your Gaming PC, An SSD for fast loading times, and 8 GB RAM, 16 GB(Dual Channel) is preferable as Games are now more demanding and take more resources if you want to play games that came out in 2022 and above plus a powerful GPU with min of 8GB VRAM.